INFORMATION Simulate Depth in an Image READ HERE - Welcome to the blog
New Home Design Minimalist, you come to this blog with the intention to find news about INFORMATION Simulate Depth in an Image READ HERE, I have it available to you as well as possible with the hope you are satisfied with the article that we serve, we also discussed about the house from the outside design to inside the house, which is certainly beautiful enough to be in view and owned, ok please read bahsan us this time.
Articles on :
INFORMATION Simulate Depth in an Image READ HERE
Article link :
INFORMATION Simulate Depth in an Image READ HERE
Article adobe photoshop,
Article depth,
Article depth mask,
Article effects,
Article graphic design,
Article image editing,
Article image effects,
Article photoshop,
Article photoshop tutorial,
Article tutorial,
Article tutorials,
Article volume,
You can also see our article on:
INFORMATION Simulate Depth in an Image READ HERE
A Depth Mask is a mask layer with a grey gradient that gives the effect of fog, smoke, dust or water. It's an extremely useful tool to add volume and depth to an image that doesn’t have it. In this tutorial, we'll be looking at how to create and apply a Depth Mask to a flat image.
 |
| It's best to choose an image that involves fog or smoke for this effect |
First, open up Photoshop and open two layers; the background layer and another for your image. Make sure that the second layer image has a Transparent background, as the background layer won't appear otherwise. A good website for free stock images with transparent backgrounds is
https://www.pixelsquid.com/. To get the best effect, be sure to choose an image that involves fog, smoke, dust or water.
Now hold Ctrl and click on the layer with the transparent image. A dotted line should outline the image you've selected. Right-click on the image and then select Save Selection. Name it whatever you like but since I'm using a car for this tutorial I'm naming it Car.
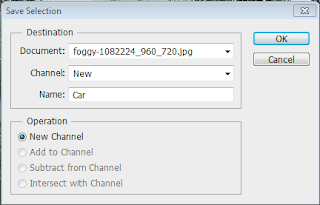 |
| This will allow you to edit the image colours |
Clicking OK will send the image to the Channels panel. To open this panel, click Window on the top toolbar and Channels should be listed. Click it and a small panel will appear where the layers were. Hold Ctrl and press D to get rid of the dotted line, then click on the Channel that you named.
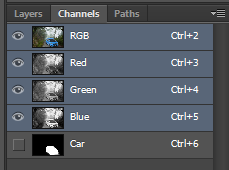 |
| We'll mostly be using the RGB layer |
Clicking on the Channel will activate it so that only it is being edited.
 |
| The black is the transparent part of the image |
Next, hold Ctrl and press I to invert the Channel. We'll be adding a Gradient to this now so select the Gradient Tool from the sidebar and press D to change the foreground colour to white. Now, open the Options Bar and select the Foreground to Transparent option (the second from the top left).
 |
| This will add transparency to the image |
Make sure that the Linear gradient option is selected and drag the cursor along the entire image, the starting point should be where the fog is thickest and the further you drag it out the thinner it gets.
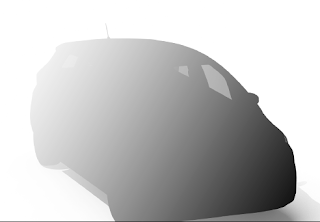 |
| Note how it fades near the back of the car |
To make the car blend better into the fog we've created we have to desaturate some of its colour. Since this car is blue, we'll desaturate some of that colour from the overall image. First, hold Ctrl and click on the car layer to select it. While you're still in the Channels panel click the RGB tab to safely exit the panel. Make sure the Adjustments window is open (Click on Window in the top toolbar and then Adjustments) and click on the Hue/Saturation icon.
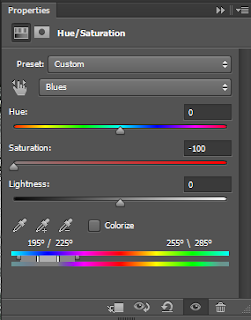 |
| The colour you desaturate depends on what image you're working on |
While this panel is open, click on the drop down beside the hand and choose blues and drag the Saturation slider to the left. This will desaturate the colour along the gradient you've applied so that it gets fainter the further away it is.
 |
| See how the back of the car is more faded |
Now we'll obscured the car further by using the colour of the fog to paint over the car. Select the Eyedropper tool and take a sample of colour from the fog in the background. Hold Ctrl and click on the Hue/Saturation icon to create a new layer with a Depth Mask. Click on the Layer tab on the top toolbar and choose Fill Layer and then Solid Colour and click OK. When the Colour Palette window appears click OK again as we already chose our colour via the Eyedropper tool.
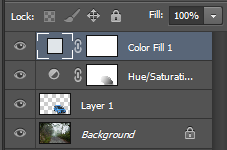 |
| If you have more than one Hue/Saturation layer, delete the other one as there should only be one |
To remove the solid colour from the image hold Ctrl and press G to add this layer to a group, then hold Ctrl and click the layer with the image (Layer 1, not the background) to load it as a selection. Next, add a layer mask by clicking the icon at the bottom of the layers panel. This will add the mask to the group you've just created.
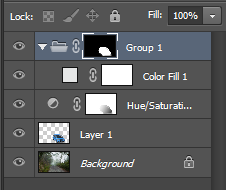 |
| Make sure that only the solid colour layer is added to the group |
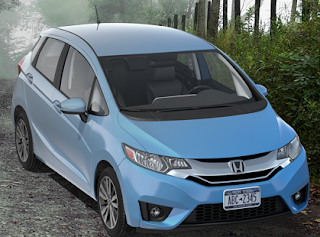
Reduce the opacity of the solid layer until the image is visible again. Now, we're done! Here's the finished image.
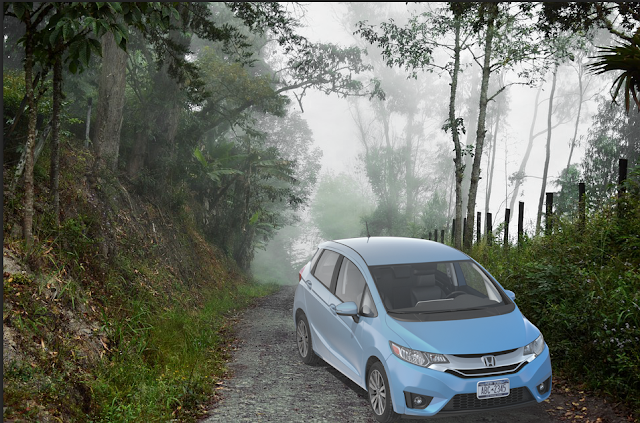 |
| Now the car looks more like part of the image |
Also finished article INFORMATION Simulate Depth in an Image READ HERE
Thus our discussion about INFORMATION Simulate Depth in an Image READ HERE, may be useful for all of you in looking for the latest models of the house.
You're reading an article
INFORMATION Simulate Depth in an Image READ HERE with a link that you can save
https://newhomedesignminimalist1.blogspot.com/2016/01/information-simulate-depth-in-image.html I hope the article is about
could be useful to you.
,
depth,
depth mask,
effects,
graphic design,
image editing,
image effects,
photoshop,
photoshop tutorial,
tutorial,
tutorials,
volume,


0 Response to "INFORMATION Simulate Depth in an Image READ HERE"
Posting Komentar